How to Create a Legal Timeline For Proper Case Chronology
Creating a strong legal timeline is key to building a winning case. Here are the steps paralegals should follow to create a proper case chronology.

A legal timeline is a sequence of events that highlights dates, evidence, actions, and facts in the order in which they occurred. Think of it as the legal roadmap for your case.
Without proper case chronology, paralegals risk missing key facts and insights attorneys need to prepare for trial, and ultimately, win their case.
In this article, we’ll go over the importance of having a detailed case timeline, how to build a legal timeline, and expert tips to make sure your case chronology is comprehensive. That way, everyone on your team is empowered with the facts.
Why Do You Need to Build a Legal Timeline?
Building out a chronology of events is critical for case management and strategy. Not only are they important to understand the overall timeline of events for a case, but they can also help lawyers better understand the progression of a client or party’s situation.
Case chronology is especially important for medical cases or those that involve medical records. Katelyn C. V. Holub, associate attorney at David W Holub Law, describes the importance of timelines for cases like these.
“Timelines and case chronologies are important to illustrate changes in a person’s medical conditions over time,” says Holub. “They can show how injuries can be traced back to a certain crash or incident based on when a person began experiencing symptoms and/or sought treatment.”
Timelines also help tell the case story clearly and persuasively, says Martin Gasparian, attorney and owner at Maison Law.
“A legal timeline helps to create clarity,” he says. “It takes away the complex parts and presents them in a clear and chronological story that is easy to make sense of. It also allows you to see the events in sequence, making it a lot easier to identify key moments, specific patterns, or any gaps in the information, which is vital to building arguments.”
Think of a legal timeline as a tool to provide clarity, improve your strategy, and better prepare clients and witnesses for trial. Here are a few specific ways that strong case chronology helps your case:
- Proper case management: Timelines help keep all of your information organized, including tracking deadlines and document filings.
- Create chronological order: Timelines give your legal team a bird's eye view of the case.
- Flag inconsistencies: When you organize all of the key events, statements, and details, you can better identify inconsistencies before the case goes to trial.
- Prepare for trial: Legal timelines help build a narrative and inform strategy, so it’s essential to have a strong case chronology to present during the preparation process.
Follow the steps below to build a strong legal timeline.
Step 1: Start Early
Starting as early as possible is one of the most important steps for building your case chronology. Don’t wait until trial prep to pull together key pieces of evidence or organize information.
As you’re first assessing a case, start gathering information about the key parties and events. Everything you collect can be used to create a base timeline. The more evidence and statements you can source, the more your timeline will evolve. But starting early is essential so you don’t miss any key details that can impact the overall strategy or outcomes of the case.
Step 2: Identify Key Parties and Evidence
Identifying the parties involved is another essential step of legal chronology. The key parties include all people, organizations, and entities connected to the case.
After you identify the key parties, you’ll also need to determine which evidence needs to be collected. To get this step right, it’s important to understand what information your attorneys need in order to build their case. This is usually dependent on the type of case you’re working on.
For example, in a medical case, you’ll need to identify the people and companies involved as well as case events, such as dates of hospitalizations, medical incidents, or the start date of treatments. In a criminal case, your goal is to identify the victims, witnesses, and defendants, as well as the date of the offense and the date of arrest.
Step 3: Gather and Organize Information
Next, gather all documents and information related to the case. This includes anything that backs up the key events you’ve already identified, from emails to bank statements to tax records.
Here’s where to look for key information:
- Medical records
- Emails and texts
- Bank and tax statements
- Witness statements
- Public records
- Contracts and agreements
- Multimedia evidence, including audio and video recordings
You’ll also need to set up a system where you can easily access and organize your case files. Create a central source of information you and your team can refer to as you’re building the legal timeline. This will be where you add any documents, statements, and supporting evidence related to your case.

This step is essential for staying organized. The last thing you want to do is spend hours chasing paperwork or examining stacks of evidence, searching for a key detail. To give your team the best chance at winning the case, you need to have an organized system in place that makes it easy to find and reference documents.
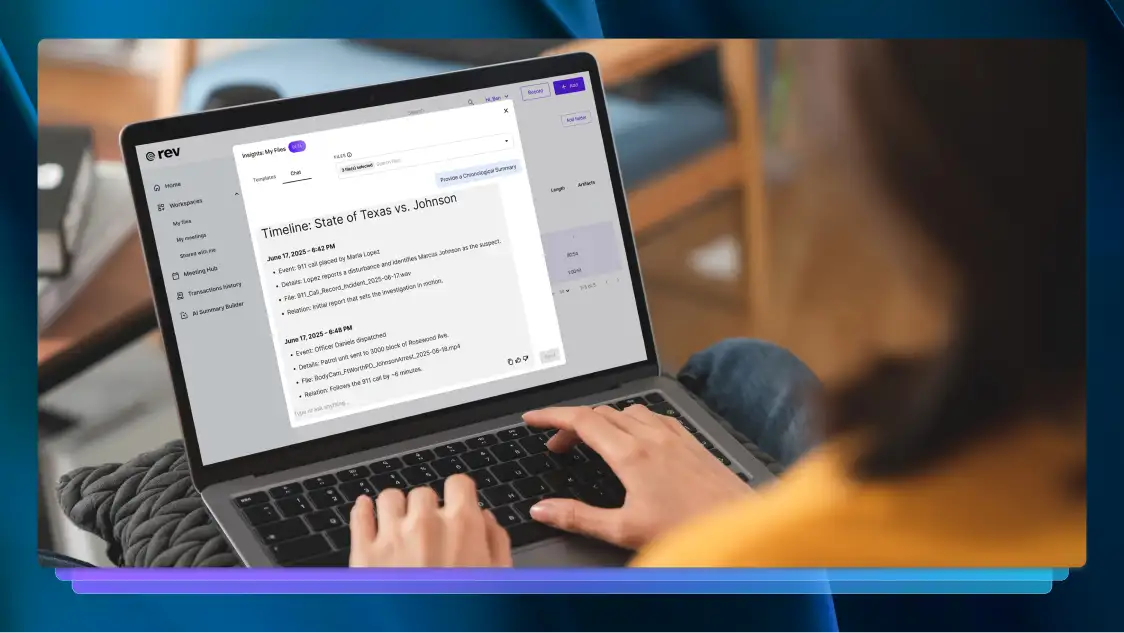
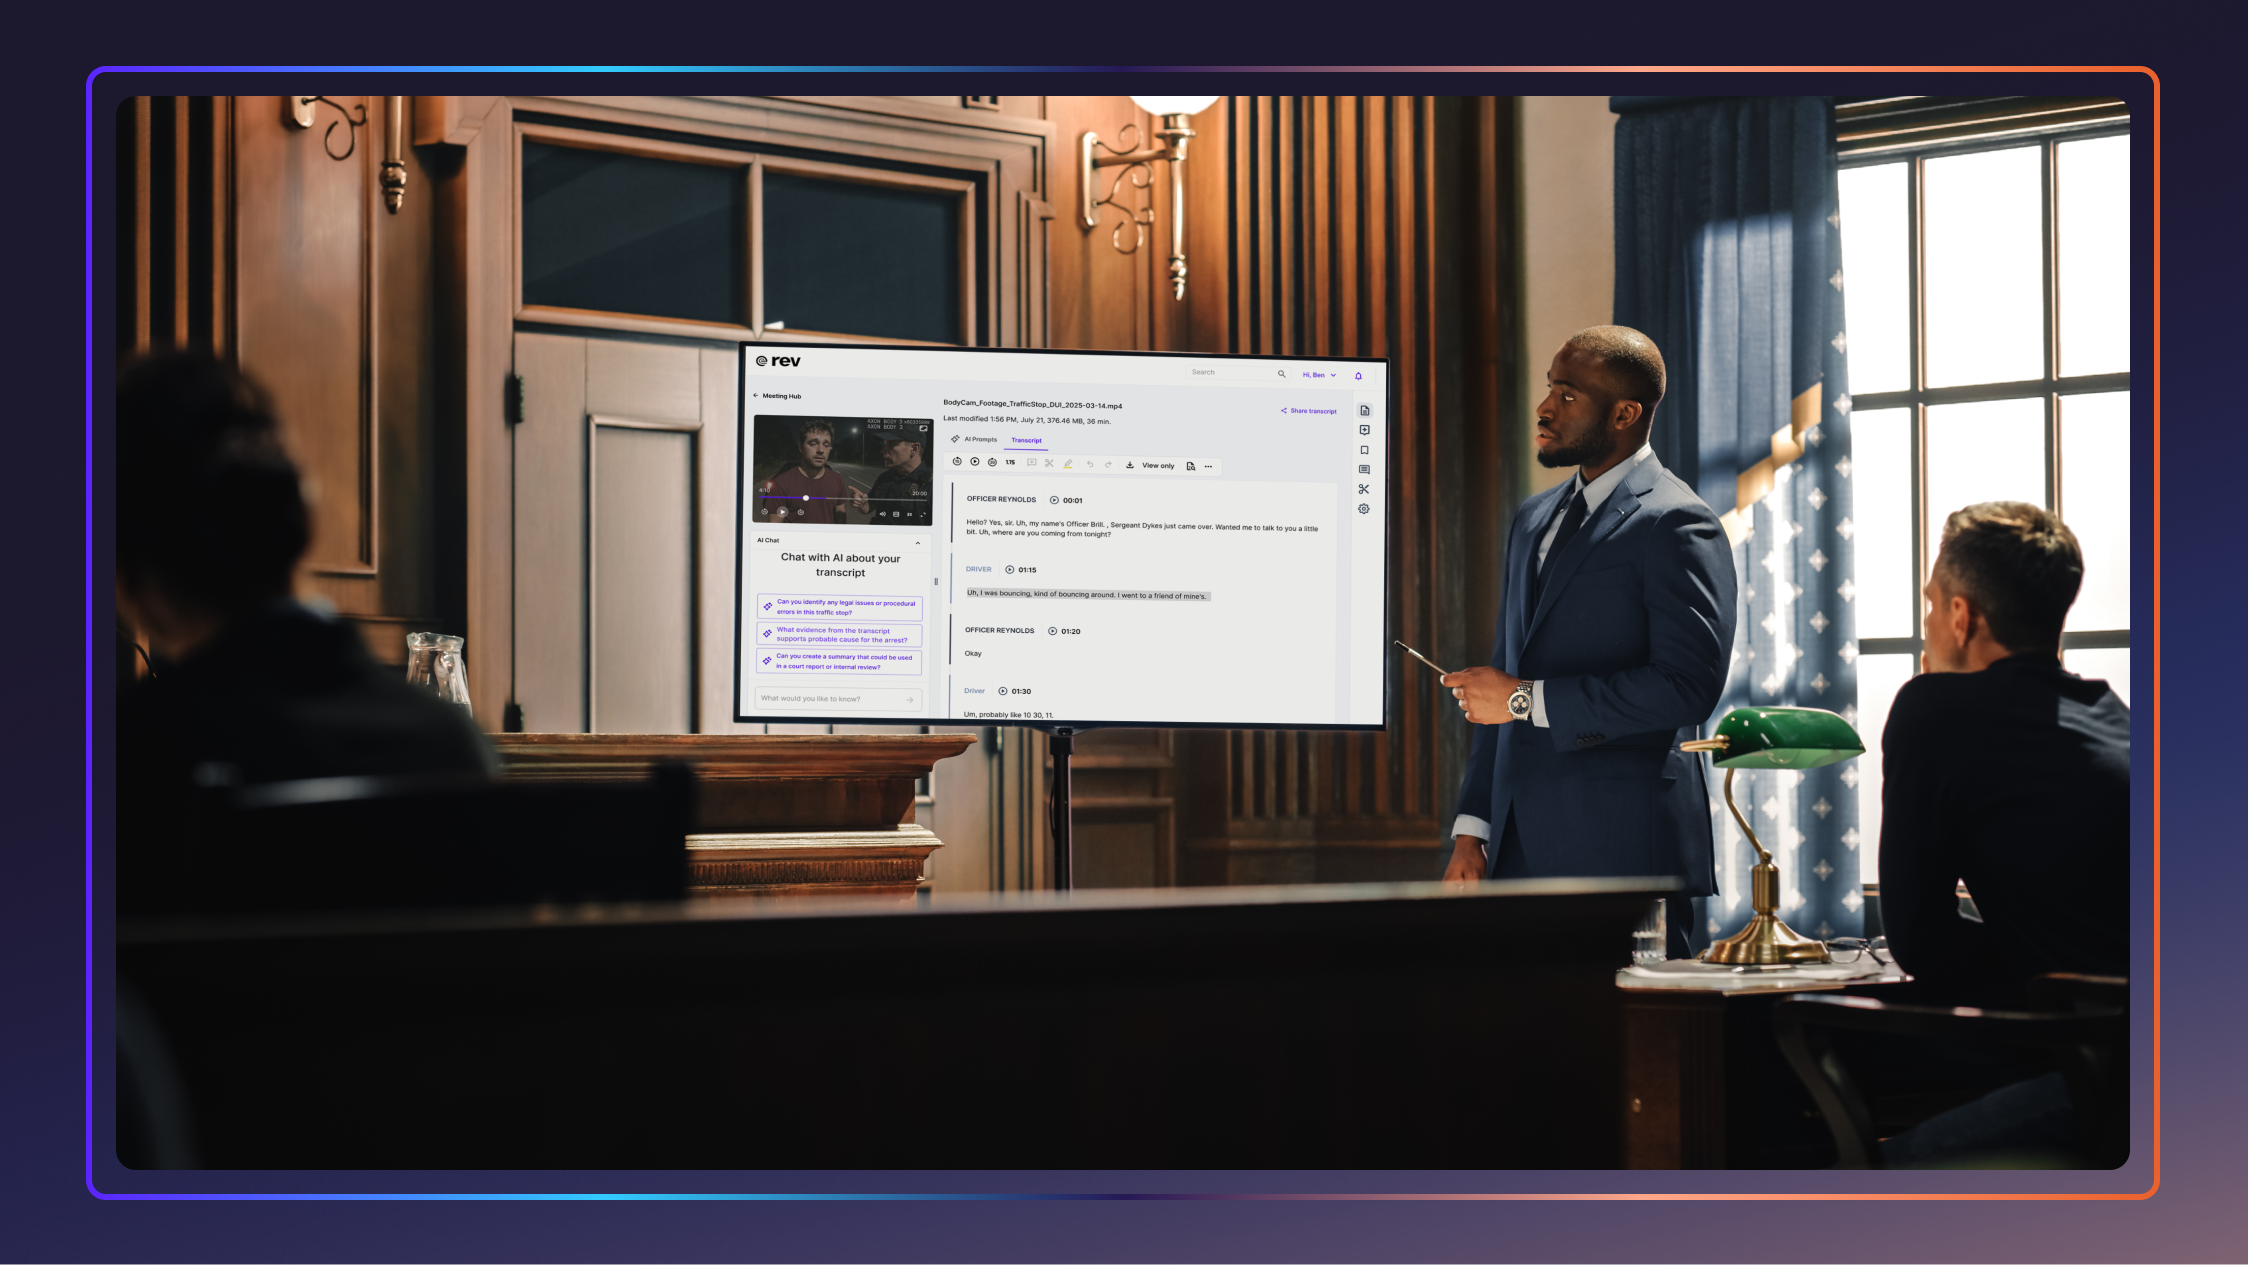
For instance, with Rev Insights, you can upload all of your case documents, including multimedia evidence such as audio and video files. From there, you can easily search across all documents so you can find the information needed at the exact moment you’re looking for it.
Step 4: Build Your Timeline Chronologically
Next, start ordering your events in a chronological timeline. You’ve most likely been doing this as you receive information, but now is the time to finalize the order of things.
Once you can see all of the key events arranged by date, you can identify any missing pieces or gaps in information. This is also a great time to link facts together in order to present a more unified story.
Step 5: Decide on Timeline Format
When it comes time to present your timeline, you’ll need to make sure to pick the format that best communicates your case narrative.
A few timeline formats include:
- Linear: The most common format for legal timelines, a linear format highlights key events in chronological order. This format is best for straightforward case chronologies where you have specific dates and activities to include.
- Gantt chart: Often used for project management, this format displays key events or activities in a series of horizontal rows that are set against a timeline. This format works best for cases where you want to showcase major milestones.
- Interactive timeline: This dynamic format allows you to scroll through the timeline and zoom in on visual components to reveal more detailed information or data. An interactive timeline is best if you’re presenting remotely or plan to highlight a lot of digital evidence.
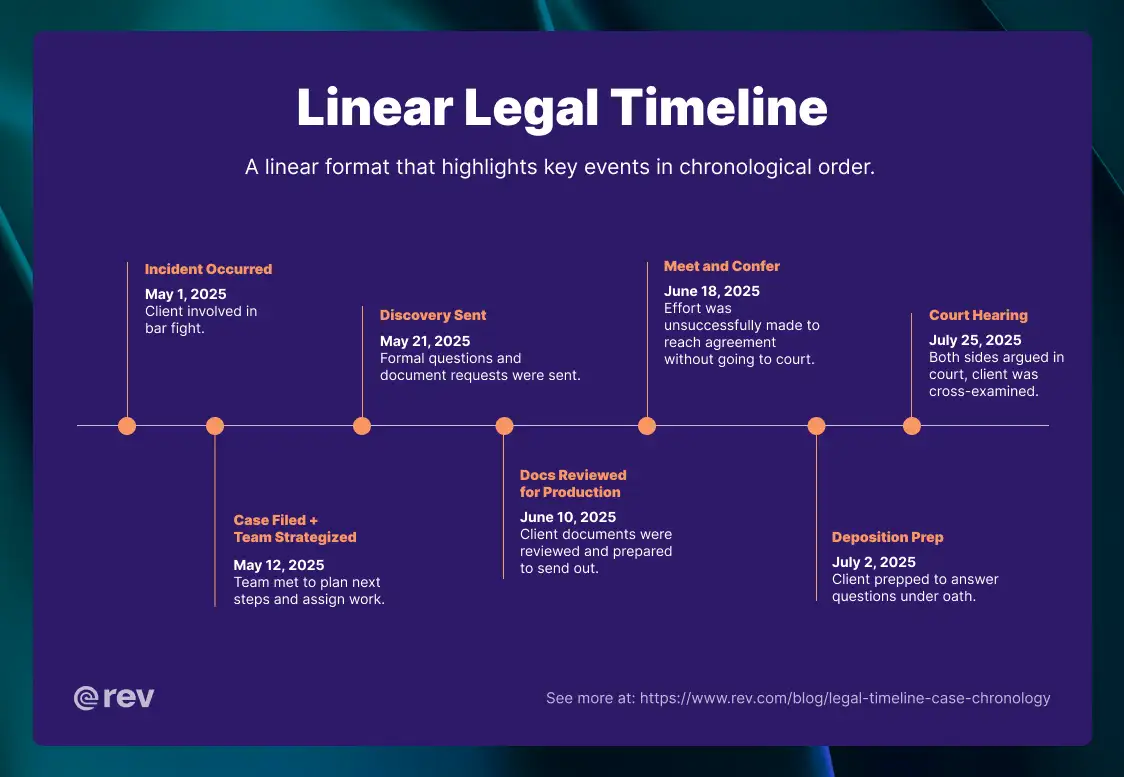
Example Linear Legal Timeline
Here’s an example of what a linear legal timeline looks like. The key events are formatted in chronological order, as shown below:
- Incident Occurred, May 1, 2025: Client involved in a bar fight.
- Case Filed + Team Strategized, May 12, 2025: Team met to plan next steps and assign work.
- Discovery Sent, May 21, 2025: Formal questions and document requests were sent.
- Docs Reviewed for Production, June 10, 2025: Client documents were reviewed and prepared to send out.
- Meet and Confer, June 18, 2025: Effort was unsuccessfully made to reach agreement without going to court.
- Deposition Prep, July 2, 2025: Client prepped to answer questions under oath.
- Court Hearing, July 25, 2025: Both sides argued in court, client was cross-examined.
Step 6: Check Your Work
Before finalizing and presenting your chronology, verify the accuracy of your information and double-check that every date, time, place, and piece of evidence is correct.
The last thing you want is to realize, while presenting, that you missed a key detail or got a date wrong. Not to mention, there are ethical and legal risks associated with presenting the wrong information or evidence during a trial, such as being held in contempt of court. Mistakes can hurt your case’s credibility, so this step is critical to present a strong case.
To reduce the risk of human oversight when reviewing your work, use a tool like Rev Insights. The AI-powered tool can analyze multiple case documents simultaneously and instantly spot inconsistencies.
Step 7: Present With Clarity
While your timeline should include all of the information needed to make your case, it’s still important to walk through it with clarity when presenting to your team.
Attorneys will use this timeline to create their case strategy and prepare for trial, so it helps if you can tell a story with the timeline you’ve built. Address the who, what, when, and where in your timeline to create a clear and persuasive timeline of events.
Storytelling is key to the success of your timeline, says Matthew A. Dolman, personal injury attorney at Dolman Law.
“My best advice for paralegals is to think like a storyteller,” says Dolman. “Every piece of paper, date, and doctor visit has a place in a bigger story. Maintain the timeline in real time and troubleshoot gaps as soon as they arise. It could make the difference between a settlement and a trial.”
Advanced Tips for Proper Case Chronology
Whether you’re new to the paralegal field or you’ve been building case chronologies for years, there are many ways to take your legal timeline skills to the next level. Everything from the way you format your timeline to how you present it can make the difference between an average case chronology and a winning one.
For starters, templates are key to a strong case chronology, suggests Gasparian. “Standardize everything you possibly can,” he says. “Create templates for documents and letters and, where applicable, create a checklist for everyday processes like gathering client information.”
Here are a few more advanced tips for creating a strong legal timeline:
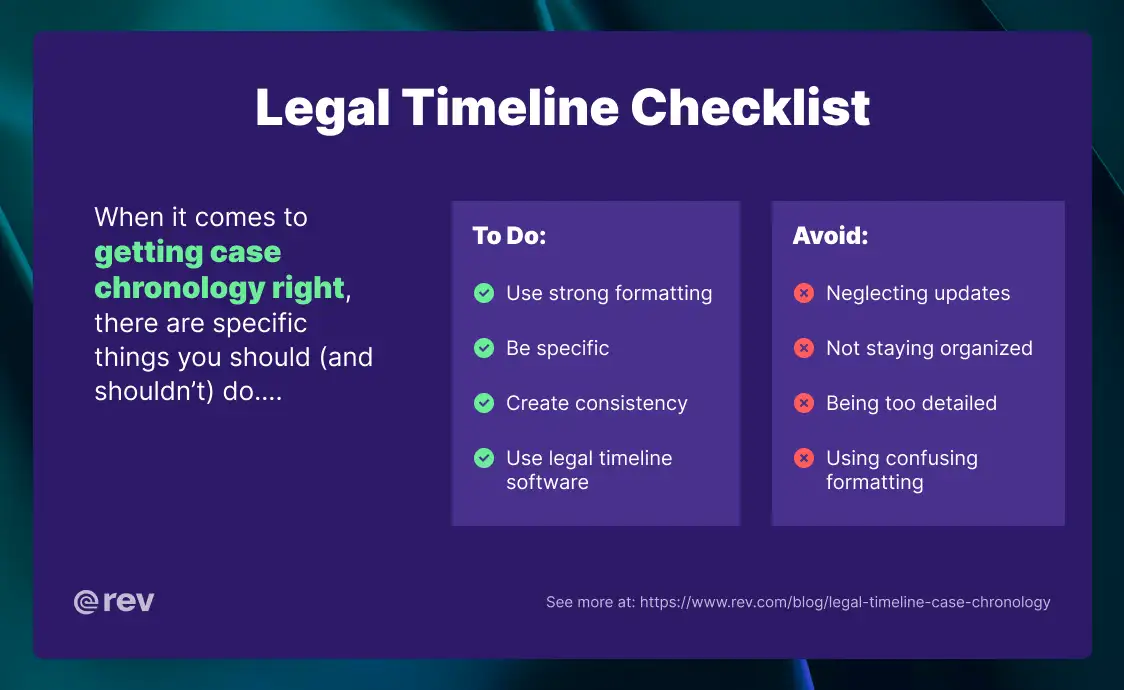
- Use strong formatting: Choose a format that makes sense for the case, is readable, and easy to understand.
- Be specific: Stick to specific, key information that provides an overview of the case. While it may be tempting to add every little detail, your timeline needs to be clear and factual. Any non-necessary details may clutter the timeline and make it more difficult to keep up with.
- Create consistency: Stick to the same elements and information throughout the timeline presentation. For example, if you use the color blue to represent your client, continue to use that when referencing them throughout the timeline to maintain consistency and make it easy to follow along.
- Use legal timeline software: Whether you use an online template to help create your timeline or transcription software to help organize your case files, using software can save you hours of time and resources.
Bonus tip: Consider using AI tools to help analyze documents and identify patterns or inconsistencies in your legal transcripts. Reading through hundreds of documents and trying to spot key details can take away a significant amount of your time. AI can accelerate this process. In fact, 77% of lawyers who use AI said it increased their productivity.
Common Legal Timeline Mistakes to Avoid
Want to ensure your case chronology is trial-ready? Avoid these common mistakes when creating legal timelines:
- Not updating your timeline regularly: As soon as you receive more evidence or documentation, see how it makes sense with your timeline. As your case progresses, you’ll have a better idea which details should be included in the timeline and can add or remove details from there.
- Not using a system to organize your information: When you don’t have a central place to build, review, and update your timeline, you risk missing a key piece of evidence. Create a database to store all of your documents and data so you can find facts or reference case materials quickly.
- Adding too many details: While you should collect as much information as possible during the discovery phase, it’s important to narrow down on key details when building your timeline. Including too many details can clutter the overall narrative and distract from the main message.
- Presenting in a confusing format: You could have all of the information needed to make a case, but if your timeline is presented in a confusing manner, then your message will get lost. The timeline needs to be visually easy to digest and easy for attorneys to understand so they can build their strategy from there.
Further Resources for Legal Case Timelines
If you’re looking for more tips for building your case timeline, here are a few recommended resources to check out:
- Legal Litigation Timeline Template: If you use Microsoft Office, this legal timeline template is a great resource. Simply download the template and edit it with your own case information directly in PowerPoint.
- Canva or Visme: You can also use online design tools like Canva or Visme to create strong presentations for your legal timelines. Both of these platforms offer professional, ready-to-go templates.
- Rev: Our AI legal transcription can help you seamlessly manage and analyze multiple case documents in one place, saving you time you can spend building a strong timeline.
- TrialLine: The cloud-based legal timeline software allows legal teams to build custom case chronologies with the option to create different views to share with multiple parties.
- MyCase: The case management platform includes a calendar and communications features that make it easy to track deadlines. See the best MyCase alternatives.
Build Strong Legal Timelines With The Right Tools
Behind every winning case is a strong legal timeline. Timelines are the foundation of your case, and paralegals are responsible for building detailed, fact-based chronologies. To ensure your timeline outlines the who, what, when, and where of your case, use the right tools to help you manage, identify, and analyze all of your case evidence in a snap.


.webp)